Creating a beautiful and organized home doesn’t have to drain your wallet. If you’re like many people trying to create a cozy space on a tight budget, you might be craving some clever and affordable ways to incorporate functional decor into your living area. This post is here to satisfy that craving with a collection of 13 genius DIY wall shelf ideas that not only look great but also provide smart storage solutions for any small space.
Whether you’re a college student living in a tiny apartment or a family trying to maximize every square foot, these DIY wall shelf ideas are perfect for you. If you love home decor but don’t want to spend a fortune, you’ll appreciate the creative options laid out here. Each idea is designed to be easy to execute and affordable, making it simple for you to elevate your space without breaking the bank.
In this guide, you’ll discover unique and budget-friendly shelving solutions that will transform your walls into stylish and functional storage areas. From rustic floating shelves to repurposed materials, you’ll find inspiration that suits your tastes and needs. So roll up your sleeves and get ready to dive into some fun DIY home projects that will beautify your space and keep it organized.
Key Takeaways
– Discover 13 creative DIY wall shelf ideas that are budget-friendly and stylish, perfect for maximizing your space.
– Each idea uses affordable materials, ensuring you can enhance your home decor without spending too much.
– These shelves serve as practical storage solutions, helping you declutter and organize your small spaces effectively.
– You’ll find ideas that fit various styles, from rustic to modern, catering to a wide range of tastes.
– Each project is designed to be easy to execute, making it suitable for DIYers of all skill levels.
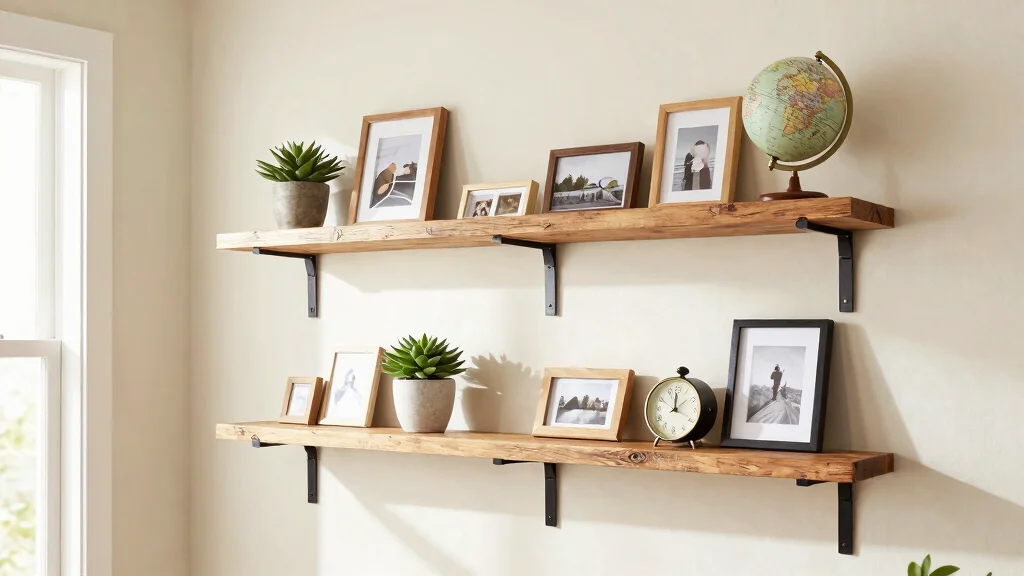
1. Rustic Floating Shelves

Embrace the warmth of rustic floating shelves, a perfect blend of simplicity and charm. Their natural wood tones create an inviting atmosphere, making any room feel cozy and stylish. Sourcing reclaimed wood not only adds character but also emphasizes sustainability, which is increasingly appealing in modern design. You can easily find suitable materials at local hardware stores or thrift shops, making this a budget-friendly project.
To achieve the best results, ensure you use sturdy brackets for installation, allowing for a clean look that doesn’t detract from your decor. These shelves are ideal for showcasing cherished books or decorative pieces, and you can choose a stain or paint that aligns with your style.
Tips for Success:
– Choose wood that complements your existing decor.
– Secure shelves into wall studs for stability.
– Consider varying the lengths for added visual interest.
This project can be completed in just a few hours, leaving you with beautiful and functional storage.
2. Ladders for Vertical Storage

Transform a simple wooden ladder into a charming vertical storage solution that enhances your space. This clever idea utilizes height effectively, especially in compact areas where floor space is limited. Look for vintage ladders at yard sales or even borrow one from a neighbor to keep costs down.
Secure the ladder to the wall for safety and utilize the rungs to display books, decorative items, or plants. This not only provides ample storage but also serves as a captivating focal point in any room.
Creative Suggestions:
– Paint the ladder in a fun color for a pop of personality.
– Hang lightweight items like throws or hats.
– Use the top rung for a small plant or photo frame.
This unique shelving option is sure to impress your guests without costing a fortune!
3. Crate Shelving Units

Wooden crates can be creatively transformed into stylish shelving units that bring both function and flair to your home. By stacking them in various orientations, you can design a unique shelving system that fits your aesthetic perfectly. Crates are often available at craft stores and are budget-friendly, making them an excellent choice for DIY enthusiasts.
Sand them down and choose to paint or stain them to match your interior decor. Arranging the crates in a multi-level format works wonders in bedrooms, living rooms, or kitchens, allowing for practical storage of books, plants, and kitchenware while maintaining a rustic vibe.
Fun Facts:
– You can leave them in their natural state for a more rustic look.
– Paint them in bright colors for a modern twist.
– Stack them vertically or horizontally based on your space requirements.
This project allows for a lot of creativity and personalization, making it a great DIY home project for those on a budget.
Did you know that a DIY crate shelf setup can cost under $20 and take under an hour to assemble? Stacking crates in a multi-level layout not only saves space, it adds rustic charm to your space—perfect for diy wall shelf ideas.
Difficulty Rating & Requirements
Overall Difficulty Rating: Medium
DIY wall shelf projects can be moderately challenging. They require some basic skills in measuring, cutting, and mounting. However, with the right tools and patience, this project is suitable for both beginners and those with some experience in DIY home projects.
Time Estimate:
⏱ Estimated time: 3-5 hours
Here’s a breakdown of the major phases:
– Planning and Design: 1 hour
– Material Gathering: 1 hour
– Construction: 1-3 hours depending on the complexity of the design
Skill Requirements:
– Required skills: Basic carpentry, measuring, and mounting
– Beginner-friendly: Yes! This project can be tackled by beginners, especially with straightforward designs like floating shelves or crate shelving.
– Skills that can be learned: You can learn measuring and cutting techniques easily through online tutorials or DIY workshops. However, using power tools may require some practice.
Tools & Materials Needed:
🧰 Essential items checklist:
– Measuring tape: Required
– Level: Required
– Drill and drill bits: Required
– Saw (hand saw or power saw): Required
– Wood screws: Required
– Sandpaper: Optional for smoothing edges
– Wood stain or paint: Optional for finishing touches
– Brackets or shelf supports: Required for floating shelves
Step-by-Step Overview:
1. Planning and Design (1 hour): Start by deciding where you want the shelf and what style you prefer. Sketch your ideas and take measurements to ensure a good fit in your space.
2. Material Gathering (1 hour): Purchase the required materials from a local hardware store. Check if you have any suitable materials at home to save money.
3. Construction (1-3 hours): Cut wood to the desired lengths, sand the edges, and assemble your shelves. Make sure to follow your design closely for the best results. Use a level to ensure proper installation.
4. Mounting (30 minutes – 1 hour): Once your shelves are ready, mount them securely to the wall. Double-check that everything is level before tightening screws completely.
Cost Comparison: Professional vs DIY:
Hiring a professional for shelving installation can cost anywhere from $200 to $600, depending on the complexity and materials used. By taking on this DIY project, you can spend as little as $30 to $150 for materials, especially if you choose budget-friendly options like repurposed wood or crates. If you’re comfortable with the tools and steps involved, DIY is a fantastic way to save money and personalize your home decor.
4. Repurposed Wood Beams

If you have access to old wood beams or pallets, they can be transformed into stunning wall shelves that radiate rustic charm. This approach is particularly appealing for anyone looking to enhance their decor without spending a lot of money. Simply clean and lightly sand the wood for a smooth finish before mounting them securely to your wall.
These sturdy shelves can hold everything from books to decorative items, and the rich textures of the wood contribute depth to your interior design.
Installation Tips:
– Ensure beams are securely fastened to avoid accidents.
– Consider adding a sealant if you want to keep them looking fresh.
– Use natural twine or rope to hang lightweight items for a rustic look.
This project is not only budget-friendly but also allows you to incorporate beautiful, natural materials into your home.
5. Unique Pipe Shelves

Elevate your home decor with unique pipe shelves that offer an industrial twist. This stylish shelving solution is ideal for modern or loft-like interiors, adding a distinct character to your space. You can find piping materials at your local hardware store, making this an affordable option for DIY projects.
Assemble sections of pipe to create a frame and secure wooden planks as shelves. This combination of metal and wood not only provides strength but also creates an eye-catching focal point in your room.
Installation Recommendations:
– Use proper anchors to secure pipes to the wall.
– Paint pipes in black or metallic for a sleek look.
– Customize wood planks to your desired length for a perfect fit.
This DIY wall shelf idea is not only affordable but also offers a contemporary flair that’s sure to impress.
Did you know diy wall shelf ideas like pipe-and-plank shelves can go from idea to install in under an hour for under $20? The metal and wood combo adds an industrial vibe that instantly elevates a space. Keep sections modular to remix later.
6. Corner Shelf Unit

Maximize your space with functional corner shelves that beautifully transform unused areas. These clever designs can make a significant impact in small rooms, turning corners into stylish storage solutions. You can create these shelves using just a few pieces of wood and brackets for secure installation.
Cut the wood to fit snugly in the corner, then secure it to the wall for stability. This design works perfectly for plants, photo frames, or decorative knick-knacks that need a special home.
Creative Tips:
– Use tiered shelving to create an eye-catching display.
– Mix and match materials for a personalized touch.
– Decorate with plants to bring life to the corners.
This DIY project is simple yet dramatically changes the way you utilize your space.
7. DIY Book Nook Shelves

Crafting DIY shelves for a book nook is a delightful way to encourage reading while enhancing your decor. These shelves can be simple rectangular shapes or more intricate geometric designs that draw attention. Use cost-effective wood planks to create a cozy corner or wall-mounted shelves for your book collection.
By mounting the shelves at varying heights, you can create a dynamic display that makes your books a focal point in the room. Add cushions or a small chair below to create the perfect reading nook.
Suggestions for Success:
– Choose a color that matches your wall or goes bold for contrast.
– Leave enough room for larger books or collectibles.
– Consider adding LED strip lights for a magical touch in the evenings.
This project is not only budget-friendly but also creates a serene space for relaxation and exploration.
8. Wall-Mounted Spice Rack

Transform your kitchen into a stylish culinary haven by installing a wall-mounted spice rack. This straightforward project enhances both the functionality and aesthetic of your kitchen. Use narrow wood boards or recycled pallets to craft a rustic spice rack that fits perfectly in small spaces.
Install the boards at an angle for easy access and an organized display of your favorite spices. This addition brings a touch of organization while elevating your kitchen decor.
Practical Tips:
– Label jars or containers for easy identification.
– Incorporate small hooks for utensils or kitchen towels.
– Use attractive jars to enhance the visual appeal.
This project is simple, effective, and keeps your spices right at your fingertips!
9. Hanging Shelves with Rope

Infuse a bohemian touch into your decor with hanging shelves that create an airy and whimsical look. Utilizing simple wood planks and thick rope, this unique shelving idea works beautifully for displaying plants and decor. To create them, cut your wood to size and drill holes to thread the rope through.
Securely tie knots above the shelves to hold them in place, creating a playful and eye-catching design. This project is not only easy to execute but also adds visual intrigue to your space.
Creative Ideas:
– Use colorful rope to match your room’s aesthetic.
– Hang shelves at different heights for a playful look.
– Decorate with trailing plants for a lush green vibe.
This simple yet stunning design transforms ordinary shelving into a statement piece.
Fun fact: rope hanging shelves are a standout diy wall shelf ideas move, freeing wall space by 25–40% while adding a breezy bohemian vibe. With just wood planks, thick rope, and a few secure knots, you can build a sturdy shelf in under an hour.
10. Upcycled Window Frames

Breathe new life into old window frames by repurposing them into charming shelves. This creative project not only adds character to your home but keeps costs low. You can often find old window frames at flea markets or salvage yards, making it a sustainable choice.
Clean the frames, apply a fresh coat of paint or stain to match your decor, and securely mount them on the wall. Use the panes to display a collage of photos or art pieces for a truly unique look.
Tips for Enhancing the Look:
– Add small hooks for hanging lightweight items.
– Use fairy lights behind the glass for a whimsical touch.
– Mix frames of different sizes for an eclectic gallery effect.
This project is as budget-friendly as it is beautiful, turning something old into something fabulous.
11. Pallet Wall Shelves

Wooden pallets can be your best friend for creating DIY wall shelves that are both affordable and stylish. Their rustic charm meshes well with various decor styles, making them a versatile choice. Source pallets from local retailers or even find them for free outside stores to keep costs minimal.
Disassemble the pallets, sand the slats, and secure them to your wall in a staggered fashion for a fun, dynamic design. These shelves can be used for plants, books, or displaying your favorite items.
Tips for Working with Pallets:
– Look for pallets that are marked safe for household use.
– Stain or paint them to match your home’s color scheme.
– Use a sealant to protect the wood if displaying food items.
This DIY project is not only a sustainable option but also allows for creative freedom in your home decor.
12. Geometric Wall Shelves

If you love modern design, geometric wall shelves can make a bold statement in your home. Constructed from simple wooden boards shaped into various forms, like hexagons or triangles, these shelves add an artistic touch to your storage solutions. You can paint them in vibrant colors or keep them natural for different effects, making them as functional as they are stylish.
These shelves serve not only a practical purpose but also function as art pieces on your wall, enhancing visual interest and style throughout your space.
Design Tips:
– Mix and match shapes for an eclectic gallery look.
– Use them to display small plants or art pieces.
– Mount them at varying heights for a dramatic effect.
This project can truly bring out your creative side while enhancing your home decor on a budget.
13. Wire Mesh Wall Shelf

Elevate your decor with a trendy DIY wire mesh wall shelf! This modern option is perfect for showcasing everything from plants to photo frames. You can easily find wire mesh at craft stores or online, and it’s lightweight and simple to work with.
Cut the mesh to your desired size and mount it to the wall, adding hooks or clips for extra functionality. This shelf not only looks chic but also offers versatility, complementing various aesthetics from industrial to minimalist.
Practical Tips:
– Pair with colorful containers for added organization.
– Use decorative clips for photos or notes.
– Consider layering shelves for more storage.
This DIY project is a fresh, budget-friendly take on wall shelving that adds an artistic flair to your space.
Conclusion

Transforming your space with DIY wall shelves on a budget is not only possible but fun! Each idea presented brings a unique flair to your home while also maximizing storage. Don’t hesitate to mix and match ideas to create something that’s truly yours. Let your creativity flow and watch your living space evolve into something special!
Start your next DIY home project today and enjoy the satisfaction of creating beautiful, affordable decor that showcases your personality.
Note: We aim to provide accurate product links, but some may occasionally expire or become unavailable. If this happens, please search directly on Amazon for the product or a suitable alternative.
This post contains Amazon affiliate links, meaning we may earn a small commission if you purchase through our links, at no extra cost to you.
Frequently Asked Questions
What are some easy diy wall shelf ideas for a tiny space on a budget?
Here are a few easy diy wall shelf ideas that fit a tiny space and a tight budget: floating shelves made from inexpensive boards, corner shelves that use awkward corners, and rustic pipe-and-board units for a budget-friendly rustic vibe.
What you’ll need: a stud finder, drill, level, screws, and a finish you love. Steps: measure the space, cut boards to length, sand smooth, apply stain or paint, and mount securely into studs or with strong wall anchors. Keep loads light and distribute weight evenly for safety. This approach is perfect for budget-friendly shelving and small space organization without skimping on style.
What affordable materials and finishes work best for budget-friendly rustic diy wall shelf ideas?
For a rustic look on a budget, repurpose pallet planks or pine boards, and pair them with black iron pipe supports or simple metal brackets.
Finishes can be stain, whitewash, or matte paint to highlight grain. Seal with a clear finish for durability. Sand edges for safety and choose straight, warp-free boards. This keeps your project aligned with affordable home decor and budget-friendly shelving while delivering sturdy storage.
How do I install wall shelves safely in a small space?
Safety first. Start by locating wall studs with a stud finder and mark the centers. Use a level to draw mounting lines, then predrill holes. Attach supports with screws into studs; if hitting a stud isn’t possible, use heavy-duty drywall anchors rated for the load. Use at least two supports per shelf and distribute weight evenly along the length. For extra stability, add a backer board or cross-bracing if needed. These steps keep your creative wall storage secure and your DIY home projects on track.
How much weight can diy wall shelves hold, and how can I maximize durability on a tiny budget?
Weight depends on wood thickness, shelf length, and mounting method. A typical 1×6 pine board mounted to studs with two supports can safely hold roughly 15–30 pounds if weight is evenly distributed; longer spans require more supports or thicker boards. To maximize durability on a budget, distribute items along the shelf, use thicker boards for longer shelves, add a backer, and choose hardware rated for the load. This helps create creative wall storage without overspending on materials, fitting nicely into DIY home projects.
What are common mistakes to avoid with budget-friendly rustic wall shelves?
Common missteps include not locating studs (leading to weak mounting), using warped boards, skimping on hardware, ignoring weight limits, and overcrowding a shelf. Also avoid skipping a finish, mismeasuring spacing, or mounting too close to outlets or switches. Take time to measure, secure properly, and test with light items before heavier loads. Avoiding these pitfalls keeps your small space organization tidy and practical for budget-friendly rustic wall shelves.

![9 Cozy Fall Tumbler Ideas [Pumpkin Spice Vibes]](https://zamiluxe.com/wp-content/uploads/2026/04/9-Cozy-Fall-Tumbler-Ideas-Pumpkin-Spice-Vibes-150x150.webp)
![15 Custom In Wall Shelf Ideas [Built In Niches]](https://zamiluxe.com/wp-content/uploads/2026/04/15-Custom-In-Wall-Shelf-Ideas-Built-In-Niches-150x150.webp)