
Creating a home that reflects your style doesn’t have to break the bank. The desire for affordable home decor often leads to a treasure trove of creativity waiting to be unleashed. If you’ve been searching for ways to add that personal touch to your walls without spending a fortune, you’ve come to the right place. This post is filled with easy DIY home decor cheap homemade wall art craft ideas that you can create with items you might already have at home.
If you’re a DIY enthusiast, a budget-conscious homeowner, or just someone who loves unique decor, these ideas are designed for you. Each project is not only affordable but also a fun way to express your individuality. Whether you’re a seasoned crafter or a beginner, these tips will inspire you to transform your living space into something truly personal.
Get ready to dive into a world where creativity meets affordability! In this guide, you’ll find 11 simple projects that allow you to create beautiful wall art. Each idea is crafted to help you explore your artistic side while keeping your budget intact. From upcycled materials to charming homemade decor, you’ll learn how to turn everyday items into stunning pieces of art that will impress your friends and family.
Key Takeaways
– Discover 11 budget-friendly craft ideas that transform upcycled materials into beautiful wall art.
– Each project is designed to be easy and accessible, making it perfect for crafters of all skill levels.
– You will learn how to create unique decor pieces that reflect your personal style without spending much money.
– Enjoy the creative process while using materials you already have or can easily find.
– These homemade decor ideas not only enhance your home but also promote sustainability by reusing items.
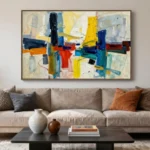
1. Upcycled Canvas Art

Revitalize your walls with upcycled canvas art, a fantastic way to breathe new life into old artwork. By simply applying a fresh coat of paint or designing a completely new piece, you can transform what was once forgotten into a vibrant focal point in your home. For instance, a dull landscape painting can become a striking abstract piece with a few bold strokes of color. The combination of old canvases and new designs creates a unique harmony that invites creativity into your space.
To implement this idea, consider using inexpensive acrylic paints and stencils for easy pattern creation. You can find old canvases at thrift stores or even repurpose artwork that no longer resonates with you. This project not only helps you save money but also contributes to a more sustainable lifestyle by reducing waste.
Consider these tips for your upcycled canvas art:
– Flip the canvas for a fresh start with new colors.
– Use stencils to craft engaging patterns with layered tones.
– Add embellishments like beads or fabric scraps for unique textures.
This creative endeavor adds a personal touch to your decor, and the textures and colors you choose will enhance the overall aesthetic of your space.
Turn old canvases into eye-catching art with a simple paint refresh—your walls evolve without breaking the bank. Upcycled canvas art proves that easy diy home decor can spark creativity and become a focal point you actually love.
2. Recycled Paper Collage

Dive into the world of creativity with a recycled paper collage that tells your personal story. Utilizing old magazines, newspapers, or even wrapping paper, you can craft a visually stunning piece that adds character to your walls. Imagine a vibrant nature scene made from torn magazine clippings or an abstract design that sparks conversation. The beauty lies in the layering and juxtaposition of different textures and colors, creating a one-of-a-kind artwork.
To get started, select a theme that resonates with you, whether it’s nature or urban vibes. Gather your materials and don’t be afraid to experiment with placement before gluing everything down. This approach is not just budget-friendly but also a fantastic way to express your style in a meaningful piece of art.
Here are some steps to create your collage:
– Choose a theme to guide your collection of images.
– Cut out relevant images and patterns that excite you.
– Arrange the cut-outs creatively on a canvas before gluing.
– Layer pieces to add depth and intrigue to your design.
The finished collage will not only serve as a stunning centerpiece but also reflect your personality and creativity.
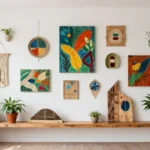
3. Natural Element Wall Art

Incorporate the serenity of nature into your home with wall art crafted from natural elements. Using twigs, leaves, and flowers not only brings the outdoors inside but also creates a calming atmosphere. Imagine a canvas adorned with pressed flowers or a frame filled with dried leaves, reminding you of serene walks in nature. This organic approach to decor fosters a connection to the natural world, making your space feel more grounded and inviting.
Begin by collecting materials during your next nature walk. Arrange these elements thoughtfully on a canvas or inside a frame, securing them with glue or twine. Pressing leaves and flowers can enhance their appearance, ensuring longevity and vibrancy in your artwork.
Here’s how to create your natural element art:
– Gather dried leaves, twigs, and flowers from your outdoor adventures.
– Arrange your finds creatively on a canvas or frame.
– Secure everything with glue or twine for stability.
– Consider pressing items for added color and longevity.
This art piece will not only beautify your walls but also serve as a reminder of the natural beauty that surrounds us.
4. Fabric Scrap Art

Turn leftover fabric into stunning wall art that showcases your love for textiles and patterns. This project is a perfect way to utilize scraps while adding a cozy, warm touch to your home. Picture a colorful patchwork of fabric shapes creating a vibrant mural on your wall. This art form not only reduces waste but also allows for endless creativity in color and texture combinations.
Start by cutting your fabric into various shapes like circles or triangles, which will create a playful patchwork effect. Attach these pieces to a canvas or wooden panel, using fabric glue for a secure hold. You can stitch around the edges for a more polished finish or allow the raw edges for a rustic charm.
Here are some ideas to bring your fabric art to life:
– Cut fabric scraps into exciting shapes for patchwork.
– Attach pieces to canvas using fabric glue for easy application.
– Stitch edges for a finished look, or leave raw for rustic feel.
This project not only gives your walls personality but also adds warmth and texture to your decor.
Fabric scraps? They’re tiny leftovers with big potential—turn them into wall art that makes your space warm and unique. Start by cutting fabric into circles and triangles, then piece them together to create a cozy, colorful mural you’ll love daily.
5. Photo String Art

Create a meaningful display with photo string art that beautifully showcases your cherished memories. This project is both fun and customizable, allowing you to arrange your favorite photos in a way that reflects your personal style. Visualize a heart or star shape made up of memories, tied together with string and adorned with decorative elements. This unique art piece serves as a lovely focal point in your home.
To craft your photo string art, start with a wooden board and some sturdy string or twine. Arrange your photos in your desired shape and secure the string using small nails. Enhance your creation with decorative elements like beads or charms for added flair. This project is a delightful way to celebrate your loved ones.
Follow these steps to create your photo string art:
– Choose a wooden board as your base for the display.
– Arrange photos in a heart or star shape for effect.
– Secure string and photos with small nails for stability.
– Add decorative touches like beads for an artistic flair.
This project not only adds a personal touch to your decor but also keeps your most treasured memories visible and celebrated.
6. Painted Wooden Pallet Art

Transform a weathered wooden pallet into a striking piece of wall art that showcases your creativity. Wooden pallets are not just for furniture; they can serve as a canvas for vibrant designs. Picture a beautifully painted pallet adorned with cheerful colors and patterns, instantly brightening up your space. This project marries functionality with artistry, providing a sustainable option for decor.
Start by sanding down the pallet to ensure a smooth surface. Choose a color palette that complements your home decor, and use acrylic paints to bring your vision to life. Experiment with different patterns such as stripes or geometric shapes to add visual interest.
Here’s how to create your painted pallet art:
– Sand the pallet for a smooth, splinter-free surface.
– Decide on a color scheme that suits your space.
– Use acrylic paint to apply vibrant patterns or designs.
Once your artwork is complete, hang it prominently for all to admire. This DIY project will not only enhance your decor but also add a touch of character to your home.
7. Upcycled Bottle Cap Art

Get creative with upcycled bottle caps to craft a quirky and colorful wall art piece. This fun project is not only eco-friendly but also a budget-friendly way to add personality to your walls. Imagine a vibrant collage of caps forming a whimsical shape or design, sparking joy and conversation in your home. It’s a fantastic way to recycle and showcase your creativity at the same time.
Start by gathering colorful bottle caps from drinks or asking friends for their extras. Arrange them into fun shapes on a canvas or board, securing each cap with hot glue. Feel free to add paint or other embellishments to enhance the overall design and make it uniquely yours.
Here’s how to make your bottle cap art:
– Collect colorful bottle caps from your favorite beverages.
– Arrange caps into fun shapes on a canvas or board.
– Use hot glue to secure each piece in place.
– Add paint or embellishments for added creativity.
This art piece will not only bring a splash of color to your walls but also serve as a great conversation starter!
8. Shadow Box Art

Create a captivating shadow box art piece that brings your cherished memories to life. This three-dimensional design adds depth and storytelling to your walls, allowing you to display items that hold special meaning. Picture a beautifully arranged collection of seashells, photos, or memorabilia layered within a frame, creating a unique piece that sparks nostalgia. Shadow boxes offer a creative way to showcase your life’s moments.
To make your shadow box, choose a deep frame that can accommodate various objects. Collect items that tell your story, arranging them thoughtfully in layers. Use foam tape to add depth and create visual interest within the box.
Here’s how to create your shadow box art:
– Select a deep frame to hold your cherished items.
– Gather objects that tell a story, like seashells or photos.
– Layer items inside the frame, using foam tape for depth.
These shadow boxes can be themed to reflect your interests, making them a beautiful addition to your decor while celebrating the memories that shape your life.
How To Choose the Right Materials for DIY Wall Art
Creating your own wall art can be a fun and satisfying experience, but choosing the right materials is crucial to achieving the look you want. Below are some key criteria to consider when selecting materials for your DIY wall art projects.
1. Purpose and Theme
Before you start, think about why you want the wall art. Are you aiming for something cheerful, serene, or eclectic? Your theme will guide your material choices. For example, if you want a nature-inspired look, consider using natural elements like wood or leaves. If you prefer a modern vibe, metal or geometric shapes might be best.
2. Size and Scale
Consider the size of your wall and how large you want your art to be. A massive piece can become a focal point, while smaller items work well in clusters. Measure your wall space before starting. For instance, if your wall is 8 feet wide, you might want a piece that is at least 24 inches wide to ensure it stands out.
3. Material Availability
Use materials you can easily find in your home or local stores. Upcycling old items can save money and add personal flair. Check your garage for leftover wood, or your craft drawer for fabric scraps. Consider using recycled materials like cardboard or newspapers, which are often free and versatile.
4. Budget
Keep your budget in mind when selecting materials. While you can buy expensive art supplies, there are plenty of affordable options. For example, paint can be a budget-friendly way to transform old canvases. If you’re crafting with friends, consider pooling resources for bulk purchases to save even more.
5. Skill Level
Your skill level will affect your material choices. If you’re a beginner, stick to simpler materials and techniques like fabric scraps or paper collages. More advanced crafters can experiment with mixed media or more complex techniques. Don’t be afraid to start small and work your way up!
6. Finish and Texture
Think about the finish and texture you want your wall art to have. Smooth surfaces like canvas and wood provide clean looks, while textured materials like fabric or mixed media can add depth. Consider how these textures will interact with your wall color and other decor elements in the room.
Pro Tip: Experiment with different combinations of materials before settling on a final design. Lay them out on the floor to see how they look together. This can help you visualize what will work best on your wall.
By considering these criteria, you’ll choose the right materials that not only reflect your personal style but also fit your budget and skill level. Happy crafting!
9. Wire Art Wall Hangings

Introduce a modern touch to your walls with wire art hangings that embody a chic aesthetic. This simple yet impactful project allows you to create text or shapes using just a few materials. Imagine a delicate wire sculpture spelling out a meaningful word or forming a unique shape, adding an artistic vibe to your space. This minimalist approach adds sophistication and creativity to your decor.
To start, use sturdy wire and pliers to bend it into your desired form. Secure the finished piece to a wooden dowel or hang it directly on the wall. For added visual interest, consider wrapping the wire with colorful yarn or string to incorporate texture into your design.
Here’s how to create your wire art:
– Use sturdy wire to shape words or designs.
– Secure the art to a wooden dowel or hang directly.
– Wrap with yarn or string for added texture.
These wire pieces not only enhance your decor but also allow for endless customization, fitting perfectly into any room’s style.
Fun fact: a DIY wire art wall hanging can take under an hour and cost less than $20 in materials. With pliers and sturdy wire, you spell out words or shapes that shine against a simple backdrop. It fits Easy Diy Home Decor Cheap Homemade Wall Art Craft Ideas.
10. Painted Rock Art

Gather smooth rocks during your next outdoor adventure and turn them into delightful painted rock art. This charming project extends beyond the garden, bringing color and whimsy to your indoor spaces. Picture a cluster of colorful rocks adorned with playful designs or inspiring quotes, each telling its own story. This fun DIY project encourages creativity while adding a unique touch to your decor.
Start by cleaning your rocks and selecting vibrant paint colors for your designs. Use acrylic paint to create patterns, images, or words that resonate with you. Once dry, seal your artwork with a clear spray sealant to protect it from wear.
Here’s how to create your painted rock art:
– Clean your rocks thoroughly before painting.
– Choose bright colors for your designs and patterns.
– Seal finished rocks with a clear spray for protection.
These charming artworks can be arranged in heart shapes, displayed in shadow boxes, or hung individually, bringing a playful and vibrant element to your home decor.
11. DIY Wall Clock Art

Combine functionality with creativity by crafting your own DIY wall clock. This project not only serves as a decorative piece but also keeps you on schedule. Imagine a beautifully decorated clock that reflects your personal style, making a statement in your space. It’s an enjoyable way to repurpose materials while adding a unique touch to your home.
Begin with a round piece of wood or canvas as your base. Use paint or decoupage techniques to add your artistic flair, creating a design that speaks to you. Finally, purchase clock mechanisms from a craft store and attach the hands to complete your functional artwork.
Here are some steps to create your wall clock:
– Start with a round base, like wood or canvas.
– Decorate with paint or decoupage to express your style.
– Attach clock mechanisms and hands for a practical finish.
This DIY wall clock allows you to merge art with function, resulting in a beautiful piece that enhances your home while being practical.
Conclusion

Crafting your own home decor is not just about saving money; it’s about expressing yourself and creating a space that reflects your personality.
With these DIY home decor ideas, you can transform upcycled materials into stunning wall art that brings joy and creativity into your home.
So, gather your supplies and let your imagination run wild in the world of budget-friendly crafts. Happy crafting!
Note: We aim to provide accurate product links, but some may occasionally expire or become unavailable. If this happens, please search directly on Amazon for the product or a suitable alternative.
This post contains Amazon affiliate links, meaning we may earn a small commission if you purchase through our links, at no extra cost to you.
Frequently Asked Questions
What are some budget-friendly DIY wall art ideas using upcycled materials?
Start with what you already have: upcycled materials like cardboard, fabric scraps, bottle caps, corks, or weathered wood. For a quick project, cover a canvas with painted fabric scraps and seal with Mod Podge. Do a decoupage using old maps or book pages for a layered look. Or create a geometric panel by painting bold color blocks on a wood plank and using painter’s tape for crisp lines. Not only is this budget-friendly crafts, but it’s perfect for affordable home decor and homemade decor ideas that still feel polished. Plan a simple color palette, arrange pieces on a board first to preview the layout, then glue, seal, and hang. This is a great example of creative wall art techniques you can master with minimal tools.
How can I create professional-looking wall art on a budget?
Choose a minimal, high-contrast color scheme and clean framing. Use painter’s tape to create geometric shapes on canvas, then fill with two or three colors for a crisp, contemporary look. Print a favorite quote on lightweight paper and mount behind glass or in a hollow frame to resemble custom art. Pair with a simple wire grid or floating shelves to display several pieces as a cohesive gallery. With these easy steps, you get DIY wall art projects that look like store-bought pieces but cost a fraction of the price, keeping your affordable home decor goals on track.
What tools and supplies do I need for easy DIY home decor wall art?
You don’t need a big toolbox to start. Gather basics: a canvas or sturdy backing, acrylic paints, brushes, a ruler, pencil, scissors or a craft knife, and Mod Podge or glue. Add a hot glue gun for sticking on upcycled elements, masking tape for clean lines, and a few nails or hanging strips for wall mounting. For upcycled touches, keep scrap wood, corks, fabric scraps, or bottle caps on hand. This simple setup covers budget-friendly crafts, DIY wall art projects, and homemade decor ideas with creative wall art techniques.
Can I personalize DIY wall art to fit my room’s color scheme and style?
Absolutely. Start by measuring your wall and choosing a palette that complements your furniture. Try layering textures—painted wood, fabric, and paper—to reflect your style. Add personal touches like a favorite map, a family photo, or a fabric swatch you love. Use simple transfer or decoupage techniques to embed those elements into your piece. By keeping the composition balanced and repeatable, you’ll produce homemade decor ideas that feel custom and cohesive across your space, all while staying within affordable home decor and budget-friendly crafts limits.
Where can I find beginner-friendly, quick DIY wall art ideas that are perfect for beginners?
Look for projects labeled as beginner-friendly—many involve easy DIY home decor steps and budget-friendly crafts. Start with under-1-hour ideas like geometric tape art, collage boards, or paint-swipe canvases, then graduate to small upcycled panels. These quick DIY wall art projects let you test color combos and techniques without committing a lot of time or money, making them ideal as homemade decor ideas to refresh a room in a day.
![9 Cozy Fall Tumbler Ideas [Pumpkin Spice Vibes]](https://zamiluxe.com/wp-content/uploads/2026/04/9-Cozy-Fall-Tumbler-Ideas-Pumpkin-Spice-Vibes-150x150.webp)
![15 Custom In Wall Shelf Ideas [Built In Niches]](https://zamiluxe.com/wp-content/uploads/2026/04/15-Custom-In-Wall-Shelf-Ideas-Built-In-Niches-150x150.webp)