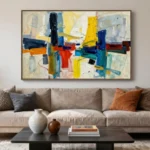
![9 Easy DIY Room Decor Wall Art Craft Ideas [Cheap Hacks]](https://zamiluxe.com/wp-content/uploads/2026/04/9-Easy-DIY-Room-Decor-Wall-Art-Craft-Ideas-Cheap-Hacks.webp)
Creating a cozy and inviting space at home doesn’t have to drain your wallet. With the rise of DIY culture, many are looking for ways to personalize their living environments without breaking the bank. This post is dedicated to those crafty souls eager to transform their walls into beautiful works of art. Whether you’re a student in a small apartment or a homeowner looking to revamp some rooms, you’ll find plenty of inspiration here.
If you’re someone who loves getting creative and making your space truly yours, you’re in the right place. I’ve gathered 9 easy DIY room decor wall art craft ideas that are budget-friendly and fun to make. These projects are perfect for anyone who wants to add a touch of personality to their home while saving money. From woven wall hangings to vibrant washi tape art, you’ll discover how simple materials can lead to impressive results.
Get ready to dive into these craft hacks that are not only easy to follow but also allow you to channel your inner artist. By the end of this article, you’ll have a treasure trove of ideas to spruce up your walls, impress your friends, and create a space that reflects your unique style. Let’s get crafting!
Key Takeaways
– Discover 9 easy DIY ideas that can transform your wall decor without high costs.
– Learn how to create woven wall hangings and painted canvas art for a personal touch.
– Explore the art of preserving nature with framed dried flowers and macramé wall art.
– Get tips for making a photo collage and upcycling vintage frames to add character to your space.
– Uncover unique techniques like geometric wall art, string art, and washi tape wall art for budget-friendly flair.
1. Woven Wall Hanging

Woven wall hangings are a beautiful way to infuse warmth and personality into your space. Combining colorful yarns with simple tools like a wooden dowel and scissors, you can create a tactile masterpiece that adds depth to your walls. The intricate patterns and textures of a woven piece can serve as a focal point or a cozy backdrop, depending on your design vision.
To embark on this creative journey, choose a mix of yarn colors that resonate with your room’s palette. Think about incorporating various textures to elevate the visual interest. This project also allows you to spend a relaxing afternoon crafting something uniquely yours.
Consider these steps to get started:
– Gather vibrant yarns in assorted textures.
– Tie lengths of yarn onto the wooden dowel with different knots.
– Trim the bottom to your preferred length for a polished look.
Not only does a woven wall hanging enhance your decor, but it also brings a sense of artistry to your home. The tactile nature of the yarn adds a cozy touch that invites warmth and creativity into your space.
2. Painted Canvas Art

Expressing yourself through painted canvas art is a delightful way to personalize your home. This enjoyable project allows you to create vibrant pieces that reflect your unique style without breaking the bank. The beauty of this art form lies in its freedom; you can use bold colors or soft pastels to enhance your space’s mood.
To dive into this artistic endeavor, choose a canvas size that fits your wall perfectly. Opt for colors that complement your existing decor, and don’t hesitate to experiment with different techniques, whether using brushes, sponges, or even your fingers.
Follow these steps for your canvas art:
– Select an affordable canvas from a local craft store.
– Decide on a color palette that speaks to you.
– Let your creativity flow and don’t worry about perfection.
This creative outlet not only results in beautiful art but also serves as a wonderful stress-reliever. Once displayed, your artwork will undoubtedly become a topic of admiration for family and friends.
3. Framed Dried Flowers

Framing dried flowers is an elegant way to bring a hint of nature indoors. This simple yet sophisticated DIY project allows you to craft stunning botanical art with minimal materials. The result is a fresh and calming aesthetic that can brighten any room while preserving the beauty of nature.
Begin by selecting flowers that dry well, such as lavender or baby’s breath, and gather them from your local florist or garden. Pressing them will enhance their beauty, making them perfect for framing.
Here’s how to create this floral wall art:
– Collect and dry flowers that appeal to you.
– Press the flowers between heavy books for a few days.
– Arrange and frame the dried flowers for display.
This charming art piece not only adds visual interest but also connects you to the beauty of the outdoors. Displaying several framed pieces in a gallery style can create a captivating focal point in your home.
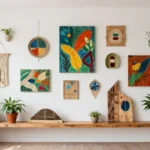
4. Macramé Wall Art

Macramé wall art is making a stylish comeback, allowing you to introduce a boho vibe to your home. With just some cord and a few knots, you can craft unique pieces that add both texture and warmth to your walls. The tactile quality of macramé creates an inviting atmosphere that feels both cozy and artistic.
Start by gathering materials like cotton cord or jute rope along with a wooden dowel for hanging. Familiarize yourself with a few basic knots, which are easy to learn and will help you create stunning designs.
To craft your macramé art:
– Choose your preferred cord type for a rustic look.
– Learn simple knots through online tutorials.
– Create patterns or shapes that reflect your personal style.
This trendy decor piece can serve as a striking statement above your couch or bed. Plus, it’s a fun project to do with friends during a DIY night!
Macramé magic is real: start with cotton cord and a wooden dowel, and a few knots turn into warm, boho wall art you’ll actually finish. Pro tip: plan one centerpiece knot, then add texture with easy variations for budget-friendly DIY room decor.
5. Photo Collage

Creating a photo collage is a heartfelt way to display your memories while enhancing your decor. This creative project allows you to tell your story through images, adding a personal touch to your space that is both stylish and meaningful.
To start your collage, gather a mix of printed photos, whether from digital sources or instant prints. Experiment with different sizes and orientations to create a dynamic layout that draws the eye.
Here’s how to bring your photo collage to life:
– Collect a variety of cherished photos.
– Experiment with layout options on the floor before hanging.
– Secure photos using clips, tape, or frames.
This project not only beautifies your walls but also evokes feelings of nostalgia and joy. Let your personality shine through every photograph you display!
Fun fact: A well-mixed photo collage with 12–15 prints can triple visual interest on a wall, taking just 20–30 minutes to arrange. It’s a budget-friendly part of Easy Diy Room Decor Wall Art Craft Ideas and a personal touch your space craves.
6. Upcycled Vintage Frames

Reviving old frames with paint and creativity is a fantastic way to add character to your decor. Upcycling vintage frames not only gives them a new lease on life but also adds a chic element to your home while staying budget-friendly.
Begin by sourcing a variety of frames from thrift stores or garage sales. With a fresh coat of paint or some added embellishments, you can transform them into stylish decor pieces that reflect your taste.
Here’s how to upcycle vintage frames:
– Look for unique frames in various sizes.
– Use chalk or spray paint to give them a fresh look.
– Hang your revamped frames in a grouped arrangement.
This creative project is perfect for showcasing your favorite art or photos, enhancing your space’s overall aesthetic. Plus, it’s a rewarding and fun activity for a rainy day!
7. Geometric Wall Art

Add a contemporary flair to your decor with geometric wall art! This style beautifully merges modern design with natural elements, making it a striking addition to any space. Creating geometric art is simpler than it may appear, allowing for a creative outlet that enhances your home.
Start by gathering a canvas, painter’s tape, and acrylic paints in colors that resonate with your design aesthetic. The process of masking with tape will help you achieve clean lines and crisp shapes.
To create your geometric piece:
– Assemble your canvas and painter’s tape.
– Tape out your desired geometric shapes.
– Fill in the shapes with paint and remove the tape once dry.
This project offers endless possibilities for customization and can tie together various elements in your room. Hang your finished piece in a prominent spot to showcase your artistic talent!
Difficulty Rating & Requirements
Overall Difficulty Rating: Easy
Creating DIY room decor wall art is rated as easy. These projects are perfect for anyone, from beginners to those with some crafting experience. If you have basic skills and a little creativity, you can tackle these projects confidently.
Time Estimate: ⏱ Estimated time: 1-3 hours per project
– Planning: 30 minutes to gather ideas and materials
– Execution: 1-2 hours for the actual crafting process
– Drying/Setting Time: Varies based on materials used (1 hour for paint, overnight for glue to set)
Skill Requirements:
– Required skills: Basic crafting skills, attention to detail, and some patience
– Beginner-friendly: Yes! All projects can be attempted by beginners with minimal guidance
– Skills that can be learned include painting techniques, measuring, and simple knotting for macramé projects. More advanced skills, like intricate designs in string art, may require practice.
Tools & Materials Needed:
🧰 Essential items checklist:
– Canvas or wooden boards (required for painted art and string art)
– Acrylic paints (required for painting)
– Glue (required for collages and frame restoration)
– String or yarn (required for macramé and string art)
– Scissors (required for cutting materials)
– Tape (optional, useful for washi tape wall art)
– Ruler (optional for precise measurements)
– Dried flowers or photos (optional for framed or collage art)
Step-by-Step Overview:
1. Planning (30 minutes): Decide on the type of wall art you want to create. Gather ideas and materials. Sketch out a rough design if needed.
2. Preparation (30 minutes): Set up your workspace. Lay out all materials and tools. Ensure you have enough space to work comfortably.
3. Crafting (1-2 hours): Follow your chosen project’s steps. For painting, start with the base color and let it dry before adding details. For macramé or string art, follow tutorials closely.
4. Finishing Touches (30 minutes): Add any final elements, like frames or embellishments. Ensure everything is securely attached.
5. Setting/Drying (1 hour or more): Allow your artwork to dry or set properly before hanging it on the wall.
Cost Comparison: Professional vs DIY:
Hiring a professional to create custom wall art can cost anywhere from $100 to $500, depending on the complexity and materials used. In contrast, with DIY, you can often create similar pieces for $20 to $50. If you’re on a tight budget or enjoy crafting, these projects are a fantastic way to personalize your space without breaking the bank. If you prefer a polished look with no effort, hiring a professional might be worth considering.
8. String Art

String art is a playful and creative way to add texture to your walls. Using just a few nails and colorful thread, you can create captivating designs that not only look stunning but also provide a fun crafting experience. The final piece can evoke a sense of nostalgia and charm, reminiscent of childhood crafts.
To start your string art project, select a sturdy board or canvas as your base. Plan out your design with a pencil, ensuring it’s something you’ll love hanging on your wall.
Here’s how to make your string art:
– Choose your board material, like wood or canvas.
– Lightly sketch your design before nailing.
– Use string to fill in your design with vibrant colors.
This tactile art form adds depth and intrigue to your decor, making it a delightful centerpiece for any wall. Display your string art prominently to impress your guests!
String art proves that a few nails and colorful thread can transform any wall into personal art. Plan your design on paper, then transfer it to a sturdy board—the result is budget-friendly boho wall art ideas that are easy to DIY and incredibly satisfying.
9. Washi Tape Wall Art

If you want a quick and easy way to refresh your walls, washi tape wall art is the perfect solution! This versatile tape comes in a myriad of designs and is easily removable, allowing you to experiment without commitment. It’s a fun and creative way to brighten up your space.
To begin creating your washi tape masterpiece, envision a design that complements your decor. Using a ruler for precision will help you achieve clean lines and a polished look.
Follow these steps to craft your washi tape art:
– Decide on a fun design that suits your style.
– Mark your layout with a ruler for straight lines.
– Apply the tape carefully, smoothing out any bubbles.
This project is a fantastic family activity, suitable for both kids and adults. When it’s time for a change, simply peel off the tape and start anew!
Conclusion

With these nine easy DIY room decor wall art craft ideas, you have everything you need to give your space a fresh and personal touch. Crafting your own wall art not only saves money but also adds a unique flair that reflects your personality.
So, gather your materials and let your creativity flow! These projects are perfect for all skill levels and can be a delightful way to spend time with friends or family.
Note: We aim to provide accurate product links, but some may occasionally expire or become unavailable. If this happens, please search directly on Amazon for the product or a suitable alternative.
This post contains Amazon affiliate links, meaning we may earn a small commission if you purchase through our links, at no extra cost to you.
Frequently Asked Questions
What are the top Easy Diy Room Decor Wall Art Craft Ideas for a budget-friendly boho look?
Here are some crowd-pleasing Easy Diy Room Decor Wall Art Craft Ideas for a budget-friendly boho look: printable quotes in thrifted frames; geometric wall art with painter’s tape; fabric collage on a canvas using fabric scraps; natural textures like a pressed leaf collage or dried grasses in a shadow box; simple embroidery hoop art with a minimalist motif.
What you’ll need: thrift-store frames or canvases, printer paper or fabric scraps, painter’s tape or washi tape, glue (Mod Podge works well), scissors, and a nail or removable strip to hang.
Try this quick plan: pick a warm earthy palette, sketch a rough layout, then print or cut, arrange, attach, and hang. You can usually finish a piece in under an hour, giving you a chic wall art ideas vibe and cheap room decor for your space.
Which materials do I need for cheap room decor wall art crafts and where can I source them affordable?
The basics are inexpensive and reusable: frames or canvases, printer paper or printable art, a roll of painter’s tape or washi tape, fabric scraps or yarn, glue (Mod Podge or hot glue), scissors, and a level.
Source smartly: hunt for frames at thrift stores or flea markets, grab canvases from dollar stores, pick up paints, tape, and glue on sale, and use scrap fabric or leftover wallpaper pieces you already have. For extra texture, add natural elements like dried grasses or cork slices. Pro tip: repurpose a corkboard or an old wooden window frame to create a rotating wall display—swap in new art whenever you want a quick refresh.
Are these wall art ideas beginner-friendly and quick to finish for busy people?
Absolutely. Most Easy Diy Room Decor Wall Art Craft Ideas are beginner-friendly and can be completed in under an hour each. Start with simple options like printable quotes in frames, geometric wall art with painter’s tape, or a fabric collage on a canvas.
Steps: plan a layout, prep surfaces, apply tape or glue, let dry, and hang using removable strips if you’re renting. With just a few basic tools, you can build a cohesive set of pieces that deliver DIY home decor and easy wall decorations without breaking the bank.
How can I plan a cohesive gallery wall using budget-friendly boho wall art ideas?
Begin by choosing a palette of 2-4 earthy tones. Gather 4-6 pieces with varying sizes and textures to create visual rhythm. Lay them out on the floor first or use painter’s tape to mock-hang on the wall. Mix frames and materials (wood, wicker, fabric) for a true boho vibe, and use a grid or an organic cluster. Leave generous negative space and aim for balanced spacing (roughly 2-3 inches). Place a focal piece in a central position and arrange the others around it. Finish by hanging with a level and tweaking placement until the whole wall feels cohesive—perfect for Easy Diy Room Decor Wall Art Craft Ideas.
Can I customize these DIY wall art ideas for small spaces or renters without damaging walls?
Definitely. Go with lightweight pieces and damage-free hanging: 3M Command strips, adhesive hooks, or removable frames. Let a few art pieces lean on a shelf for extra flexibility and avoid drilling altogether. Use removable wall decals or washi tape patterns for a temporary accent wall, and swap art out seasonally to keep the space fresh. With careful planning, you can achieve cheap room decor and easy wall decorations that fit small spaces or rentals.
![9 Cozy Fall Tumbler Ideas [Pumpkin Spice Vibes]](https://zamiluxe.com/wp-content/uploads/2026/04/9-Cozy-Fall-Tumbler-Ideas-Pumpkin-Spice-Vibes-150x150.webp)
![15 Custom In Wall Shelf Ideas [Built In Niches]](https://zamiluxe.com/wp-content/uploads/2026/04/15-Custom-In-Wall-Shelf-Ideas-Built-In-Niches-150x150.webp)